Highly complex shapes are a feature of many aerospace, motorsport and medical applications. Reasons vary from maximising weight reduction to providing a surface that biological cells can infiltrate, but in most cases geometrical complexity makes quality verification difficult. For a technology looking to expand into these safety critical markets this risks becoming a key barrier to adoption.
Quality verification can be carried out either by tight process specification or by non-destructive testing (“NDT”). Of the two, NDT is much more desirable as it is a positive test of product integrity rather than an expectation that if certain procedures are followed the product will function as desired. Compounding this, additive manufacturing is particularly vulnerable to process variation which makes reliable NDT a necessity for future market expansion.
Balancing the weakness of conventional NDT approaches when applied to AM parts, there is also one key advantage: layer-by layer manufacturing. If the part is tested after each layer is made, then new NDT approaches can be developed and traditional ones can be enhanced. This article offers a brief overview of the leading techniques in NDT for laser fusion powder bed AM together with some thoughts on their cost of implementation and scope to adapt the more conventional NDT approaches to AM.
Images and image processing
This is the most mature process and already offered by both machine manufactures (e.g. EOSTATE from EOS) and 3rd party vendors (e.g. Sigma Designs). High resolution digital cameras are now cheap, but the lenses required to image the small meltpool, conditions in the build volume, and the requirement for high dynamic range push costs up to the $1000-3000 range. Prices are higher again if the hardware is bought as a package along with image processing and product support.
With regard to machine vision and digital processing technology, huge investments are being made by other industries which will benefit in-process monitoring for AM but the bigger problem for vision systems is to know which visual cues, once identified, are important.
One area where imaging costs have historically been high is thermal imaging at longer wavelengths (lower temperatures). Existing low cost digital cameras have intrinsic sensitivity at wavelengths up to about 1.2 µm (if the IR filter is removed), which is enough for visible light spectroscopy and for basic temperature estimation above about 400°C but meltpool monitoring for polymers needs longer wavelengths. True thermal imaging cameras have traditionally cost $10,000+, but new lens materials such as Cleartran (ZnS) can be bought for less than $200 even in 1-off quantities. As a measure of this cost reduction, companies such as FLIR and SEEK now produce room temperature thermal camera add-ons for smart phones for less than $200.
Melt Pool Spectroscopy
Spectroscopic techniques are starting to be explored as a method for melt pool monitoring as well as the analysis of material loss into the plume above. The cost of off-the-shelf industrial spectroscopy systems remains fairly high, but the cost of the constituent parts have fallen substantially in recent years. Today’s low cost detectors and microprocessors are enabling very low cost spectrometers to be built by the open source community for under $100 (e.g. myspectral.com) which could enable spectroscopy across a wide range of AM systems.
Laser Induced Breakdown Spectroscopy (LIBS) is a closely related technique to melt plume monitoring that has been developed by other industries (most notably the nuclear industry e.g. www.appliedphotonics.co.uk). Researchers in metal AM are exploiting a similar process in plume monitoring where they benefit from the already enclosed build volume and existing laser to minimise the additional cost of spectroscopy.

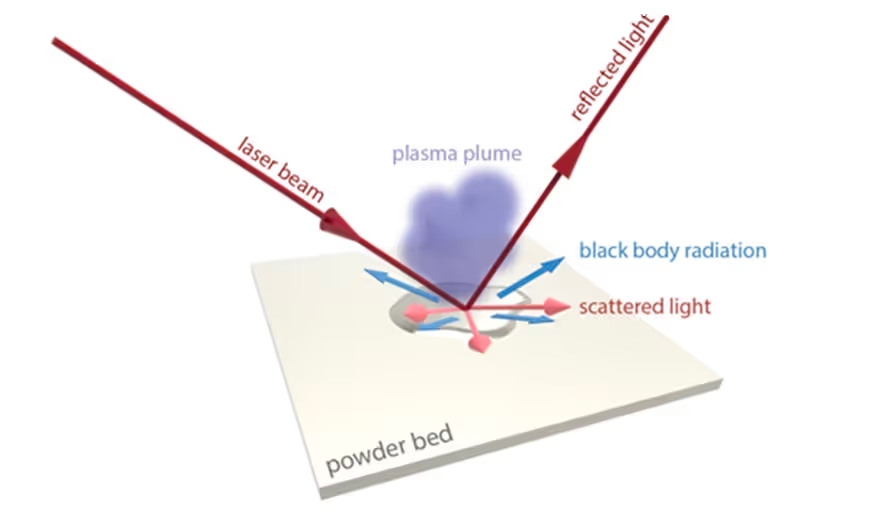
Laser Induced Breakdown Spectroscopy (LIBS): The incident laser beam’s energy is partly absorbed, partly scattered and partly reflected by the powder. The absorbed energy heats the powder causing it to emit black body radiation (i.e. glow) and to eject elements from the surface forming a plasma plume above the melt pool.
Ultrasound & Eddy current NDT
Cameras and spectrometers are fundamentally surface observation instruments, but many of the important defects such as voids and delaminations don't exist until further layers are deposited on top. For his reason we suggest that safety critical parts will require ultrasonic or eddy current testing since both techniques penetrate the overlying material and are widely deployed in the NDT of conventionally manufactured parts. However, they have the following problems when applied to AM parts:
- Geometric complexity of parts makes ultrasound reflections difficult to interpret.
- Coupling sound across the rough surface of AM components is difficult to do mechanically without liquid couplant.
- Eddy current probes do not require physical contact but must be placed close to every surface of the complex AM part, many of which are not easily accessible post build.
Surface access and ultrasound reflection complexity are naturally solved by layer-by-layer monitoring and the cost of existing NDT systems can be used to estimate what they might cost when integrated into an AM machine. Assuming the current architectures being proposed for ultrasound and eddy current NDT the costs for eddy current systems are likely to be on the order of $2000-$3000 per unit but costs for layer-by-layer ultrasound are likely to be much higher since non-contact ultrasound requires a laser interferometer to measure surface vibrations induced by a laser pulse. Both techniques are likely to slow build times as well, and this will add to cost in heavily used systems. This can be significant since interest payments alone on a $400,000 AM machine are about $5/hr for most businesses.
X-rays, XRD and X-ray Tomography
To the knowledge of the author no industry has ever adopted X-rays with enthusiasm. Health and safety issues, both real and imagined, have always discouraged adoption unless no practical alternative exists. In the case of AM the advantages of X-ray analysis can be very substantial and have led significant and growing use. They provide detailed density and structure data for both source powder and final part analysis but at a high cost. Systems can cost over $300,000 and prices need to fall substantially to enable widespread adoption. We see strong opportunities to reduce the cost of detectors and the digital processing of X-ray data, but several aspects of x-ray generation make large scale cost reductions difficult or unlikely.
This article is abridged and updated from Metal AM, Vol. 2 No. 4 Winter 2016) where more details and references can be found.


